Wednesday, September 12, 2012

Love is...

I have an awesome husband (just don't tell him- I don't want his head to get too big!). Just before our anniversary I went up to Oban in Scotland to get some much overdue help with ideas for my floundering PhD- a full-on, totally worth it trip, although 15 hours travel within the UK just to get there is crazy stuff. But back to the point. While I was away on said trip, the other half of us totally transformed our bedroom as an anniversary surprise. Just shy of two weeks of hard work in the evenings (and I'm guessing into the night) as he still went to work full time, so a pretty amazing achievement.

We started mulling over ideas for our bedroom as soon as we moved in, but had made little progress. When I first moved for my PhD, we bought/ were given some pine furniture, all pretty solid, but all mismatching. For ages we talked about painting them to make them look more 'together' and as the other half of us has an aversion to pine. After we bought the paint for the wood in the WC (story here), we decided to give it a go on a chest of drawers that is beginning to get tired, to see if we liked the effect. I am loving all things grey at the moment, and the light grey tone of 'light rain' seemed perfect for our furniture. And we loved it. But that was as far as we had got on project bedroom when I went away. 

before...
...and after

When I left, our bedroom had magnolia walls, with years of holes and bad patch jobs simply painted over. When I returned three walls were perfectly smooth and white, and the wall behind the bed the most beautiful shade of slate grey. All the furniture was the pale grey satin, and the radiator and windowsill gleamed with fresh paint. The room even had a white door, and at last my long mirror was attached to the wall rather than just drunkenly leant against it. What an awesome surprise!

And he even remembered to snap a few shots of work in progress so I can share the process:

starting to paint

grey paint going on

furniture primer...
...and paint

putting it back together

finished project...

...view 2

...view 3

...view 4

finished panorama

Friday, July 27, 2012

One Year In...

It's hard to believe we've been married a year already. In some ways it only seems like yesterday that we were at the wedding, but it also seems like such a long time ago when we think of what we have done since. We went on an amazing honeymoon thanks to the generosity of friends and family, bought our first home, and moved to a place we have grown to love in west Wales. We have a beautiful niece born nine months after the wedding (coincidence?!), and new friends in our new hometown to add to our amazing family and friends.


I'm told the first year of marriage is the hardest. I can't say whether that's true or not as we've only had one year of marriage, but I wouldn't say the marriage bit was hard so far. The hard bits of this year have not been the personal things but those related to my PhD: I have really struggled to feel motivated to carry on studying, and wasted a lot of time going round in circles. That said the other half of us has been amazingly supportive- he cooks dinner most nights, cheers me up when I need it, and moans along with me when that's what I need. So far being married (i.e. having each other) is what has made the year less hard. So far I love it.

On our anniversary

We decided to spend our anniversary somewhere in west Wales, on the beach preferably, and stay the night in a B&B. But fate had other plans, which turned out to be just as special. While I was working away up in Oban, the car spectacularly failed its MOT, with unaffordable repair costs. The other half of us had to borrow a car to pick me up from the station on my return (the nearest station is a 50 minute drive away), but with my sister and 3 month-old niece coming to stay in only a few days, we couldn't rely on being able to borrow cars. So in stepped said sister and my brother-in-law. They had a car that had been off road since they moved back to London, and not yet sold. So the next evening, we hopped on a train to spend the weekend (and our anniversary) with family in London. There is something so lovely about time with family, especially time that you weren't expecting to have. And we gained a working car. We ended up spending our anniversary exploring areas of London we hadn't really seen before, having coffee with family, and going to the Damien Hirst exhibit at the Tate Modern. Not the day we thought we'd have but it was wonderful all the same.

Project W.C.

We decided to keep our first proper project on the house as simple as possible, no structural changes, no massive alterations, to ease ourselves into the renovations. So we tackled the smallest room in the house, the upstairs WC.

I should mention here that as we have a topsy-turvy house- as it is built into a hill, you walk in upstairs where all the living areas are, and then go downstairs to the bedrooms and main bathroom. This does have one great advantage in that the living room has an amazing picture window looking out across the stream and farmland beyond. But it does tend to make people confused when you talk about the rooms.
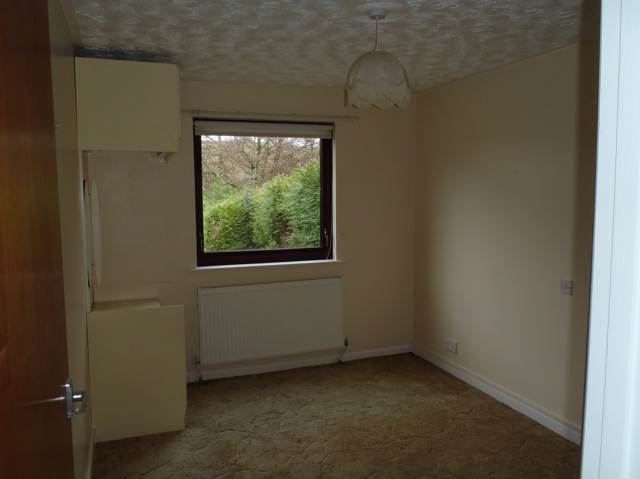
Starting point


As you can see, the room is rather outdated and tired. The loo and sink are actually in pretty good shape (and white), so as we are on a pretty tight budget we decided to keep those, and to just brighten up the room with a facelift.

Dismantling
Removing the sink


First tasks involved taking as much out of the room as possible and removing all fixings. This took longer than we expected as we had to working out the plumbing, and what we needed to turn off where, to stop the water supply to the sink. Unfortunately when the house was plumbed, the plumber didn't bother putting valves into the pipes close to any of the outlets so it was a game of turning stopcocks off here and there to see what worked. The sink itself took a fair amount of time to remove and many trips to B&Q to get the right spanners (and a trip next door to borrow a tool from our neighbour who is a plumber), but at last it was off the wall. It's a tricky thing as it's small and the nuts attaching it to the pipes are in long narrow recesses in the back of the sink. And the taps were even more fun to detach from the sink, not helped by the fact that they had been glued into position!

Starting painting
Undercoat on


Behind the sink and toilet is a wooden tongue-and-groove partition, hiding the cistern and pipework. The wood was pretty dark, and made the whole room seem dingy, so we opted to paint it. With the taps covered in plastic bags against drips, and other pipes and the gas meter (what a silly place for it!) taped around, we got to work sanding and cleaning, and then painting. We used a white primer and undercoat in one, followed by two coats of 'satin rain' satinwood. It is now a beautiful pale grey colour.

The loo also has a set of hooks mounted on a wooden strip in it as we don't have another place to hang coats, shopping bags etc. The old hooks were mismatching and tarnished, so we took out the old hooks, painted the wood to match the other wood in the room, and screwed new hooks into it (good old Ikea).

Chaos!


After a bit, the whole upstairs of the house had descended into chaos with tools, sinks, taps, paint cans etc everywhere. But at least we were moving forward! After painting the woodwork we got to work on the walls. The entire house has been given a coat of magnolia paint just before we bought it, presumably to hide the mess left behind by a few years of tenants renting the place, but I'm not a fan of magnolia for every room. Instead we painted the room matt white, which made it look so much bigger and brighter. We also painted the brown wooden window frame with white gloss paint.

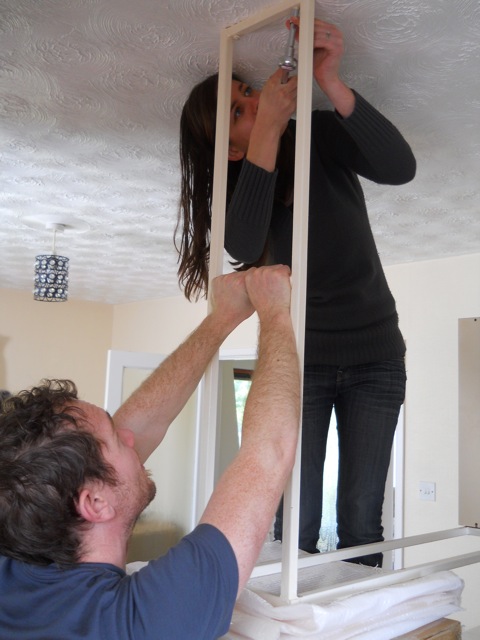
Three of the four walls in the room are hollow, so putting up fixtures proved to be a challenge. We bought special plasterboard screws that were quite a challenge to get in right (involving yet another B&Q trip to get a bigger drill bit) but at least the mirror is unlikely to come crashing down any time soon.

Varnishing the new worktop


The original worktop in the loo was a piece of chipped chipboard, with the screws to hold it in place rusting away on the top. We replaced it with a piece of solid beech (a leftover piece my parents had lying around that turned out to be the exact depth we needed). We cut it to length,with me sat on one end on the kitchen counter as we don't yet have a workbench, and then sanded it many times until it fitted exactly in the space. We then gave it two coats of clear varnish all over to seal it against any moisture.
Using the old lino as a quide


The next step was the flooring: out with the worn and stained wood-effect lino, and in with some pale grey and white squared lino. It took a bit longer to get this stage done as the town we live in doesn't really sell much in the way of flooring so we had to wait until we could go elsewhere to get something that we a) liked enough and b) could afford. Using the old lino as a cutting guide helped speed the process up considerably, but it's a pretty awkward space to lay lino in, especially when you want all the edges to tuck neatly beneath the skirting boards.

Laying the new lino...
...trickier than it looked


The internal doors in the house are all brown sapele doors. I'm not much a fan of them anyway, I find they make rooms look darker and they have no texture to their surfaces, and these doors were in an even sorrier state than most. But maybe I'll write about the doors another day. I will say though that replacing the door on the upstairs loo made a huge difference to the overall feeling of the room.

Chiseling out the doorframe for the latch and lock

Painting the door


And so at last we have a finished room. It took a bit more time than we thought (like every DIY project!) but we're really pleased with the finished effect. Overall the cost wasn't much, if you ignore some of the tools we had to buy which will be used again and again. Just a few cans of paint, the new taps, lino, a mirror, some hooks and a new towel hook and toilet roll holder.

Finished project!


Here are a few shots a bit closer in to some of the areas we changed. The new taps completely updated the sink, and adding a wide mirror to the wall made the room seem so much bigger. Lighter walls and floor, painting the window frame white and having a new white door brought the whole room together.


Much better!
White windowframe
New taps
New wide mirror


Looking at the pictures before and after side-by-side makes me appreciate the work we put into it. If we had a bigger budget we might have done things a bit differently, but just having a lighter brighter room makes all the difference to us.

Before...
and after!

Friday, June 15, 2012

Project No 1.

The first DIY project in our house took place only the day after we moved in, and what a difference it made! 

Our kitchen is a little tired. It may have been tired since it was put in in the 1980s when the house was built: for instance the drawers have not all been installed at the same heights, and one even gets wedged on the knobs for the hob as you open it. It has one string and fibreglass (!) counter-top and one tiled. And since this rather dubious installation, the kitchen has been well used, particularly by the somewhat dubious-sounding tenants when the house was rented out. In order to sell, the room obviously needed a lick of paint, which is was given, right over the holes in the wallpaper and even the tiled counter. Which gives an interesting effect. 

Yet the worst thing when we moved in was the fact that a row of cupboards had been suspended from the ceiling, stretching across the room. They blocked out almost all the light, which is an achievement for a room with three windows and an external door. 

(Looking in from outside) cupboards blocking all light...


So our first goal, especially while we still had our parents with us, was to pull the cupboards down. But, as has turned out to be the case with all our 'small' projects since, this task turned into more of a mission. 

Step 1: Remove back panel

When mounting 'wall' cupboards a cross a room, they obviously cannot be mounted onto the walls. So instead they were hung inside a large metal frame suspended from the ceiling. Which turned out to be a nightmare to remove. 

Step 2: Unscrew and remove cupboards from frame

The cupboards themselves came out fairly easily from the frame, just a few screws and a gentle push and out they came. Makes you wonder how secure they really were. 

Step 3: Try and work out how on earth to detach the frame from the ceiling

Then came the fun part. No matter how much we tried to remove the bolts holding the frame to the ceiling, they weren't budging a centimetre. So the only option seemed to be to survey them from above, i.e. from the loft. So up the other half of us went, gingerly making way across the unlit, un-boarded loft, complete with exceedingly thick insulation. 

Step 4: Enter the loft to remove the bolts!

As it turned out, the bolts were the longest I have ever seen, stretching through the ceiling and through the joists in the loft above. After a fair amount of message relaying and tool passing, the nuts were removed from the bolts in the loft and the frame could be pulled down. Mission accomplished! And what a difference it made to the light in the kitchen. Still a long way to go to make the kitchen as we want it, but definitely a huge improvement. 

Step 5: Remove the frame and survey the chaos!


Our first house

The biggest change for us in our first year of married life has been buying our first home. After nearly three years in a damp flat, we couldn't have been happier to move to our own home. At least here if things go wrong we can (let's hope!) fix them.

Moving from a small one-bed flat to a three-bed house has also meant that we can finally put all our things away, and reclaim possessions stored at my parents' house, and at last start getting our photos and artwork up on the walls.

The move does has one drawback though. We have moved to be closer to work for the other half of us, but this puts me an hour and a half drive from the university and my friends. Needless to say this has taken time to adjust to but I am getting there, helped by the fact that we love having our house.


Crossing the threshold!


The front

The rather aged kitchen

Living room with picture window

Too much brown...

The rather retro bathroom

In need of some decorating

A few odd jobs here and there...

The back

Photos (eventually!)

Nearly a year has gone by since the wedding (what?!) and still nothing has been done with the photos. But it is definitely time to share them, before moving on to new news.

How nice it is to look back at the photos and remember the amazingness of the day. Funny though how you change your mind over time as what you really think captures the day best...


Arriving at the church


The wedding party


Walking down the aisle


The church


Signing the registers


We're married!


Church


Beautiful bouquets thanks to my amazing sister


Baby bridesmaids showing the way


The Black Barn


Our lights


Hogroast queue


Summer sun


Wheat fields


Sisterly hugs


Cake


Sisters dancing


Bridesmaids


Whirling baby bridesmaids


A moment to ourselves


Married!


Photos by Lauren McGlynn and various family members